Sunday, February 24, 2013

StarBoy's Walkthrough: The Lost Vikings (SNES) Stage 10

StarBoy's Walkthrough:
(SNES edition)
February 23rd-24th, 2013
Stage 10 - BBLS
Item(s) - 1 extra health shield, 2 healthy fruit A, 1 red key, 1 healthy fruit B, 1 yellow key, 1 wipeout bomb
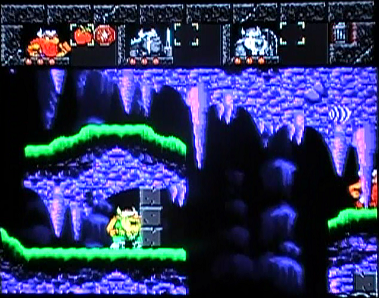
Back outside again the vikings find themselves positioned in the bottom-most portion of the left corner.
Up above you is a blue dinosaur moving back and forth; when it's not in the way, climb up the ladder as Olaf and stand in front of it so it will continuously gnaw at the shield to no avail.  Once that's done, switch to Baleog and proceed upward to slay the overgrown lizard, two times.  Slightly to the right is an acid-spewing snail, so position Olaf in front of so it will fire at your shield.  Then choose Baleog once more to slay the slug with two hits.  Go now to the ladder in the left.
In the subsequent upper portion are a couple of red dinosaurs charging back and forth.  Climb up as Olaf first and position him in front of a red dinosaur so it will stop.  Slay it with a couple hits in order to kill it.  Do the same with the other dinosaur to clear the path ahead of you.  In the left is an extra health shield any viking can equip, and to the far right is a healthy fruit A.  Proceed!
Rising up from the deathly acid are a series of bubbles which you can cross in order to reach the other side.  It's easy and manageable enough with Erik and Olaf, since the former can jump and the latter can glide down with the shield above him.  The only one that's at a disadvantage here is Baleog.  But there is a trick to this: stay on the bubble you're currently on, and when it gets high enough, there'll be a new bubble emerging from below next to it, and then you fall down to it.  Rinse and repeat, and eventually you'll be on the other side.
Climb up the ladder as Olaf and hold the shield above his head.  On the opposite side of the door is a ladder, but it's locked and will require a key.  Jump up on the shield as Erik and then jump to the upper platform.
Near the ladder is a red key which you can take.  Go back down to Baleog and Olaf and place the key in the red keyhole.  Guard the door first as Olaf.  Now behind the door is a rampaging red dinosaur going back and forth, so kill it as Baleog.  If you walk a little more you'll find a healthy fruit B.  Now everyone can climb up the ladder!
Climb up the ladder as Olaf, and then climb another one where you'll find a blue dinosaur on a small spot roaming left and right.  Position yourself in front of it with your shield at your stead so it won't hurt you.  Join Olaf as Baleog and eliminate the blue dinosaur at once!  Now climb the subsequent ladder up to the top.
Walk over to the left until you see an acid-spitting snail blocking the way.  Dispose of it as Baleog.  Keep walking forward until you see a red dinosaur charging towards you.  Slay the vile lizard with two hits and it will die!
Walk all the way to the left until you come across a ladder.  Climb it up and stand there facing the right so the red dinosaur will charge towards you and hopelessly gnaw at the shield.  Kill the dinosaur to clear the path.  Above you is a yellow key, which can be accessed with Erik, and slightly below the platform is a healthy fruit A.  Proceed onward.
Below the platform on the right is a wipeout bomb which you can use to get rid of all the enemies on screen.  If you want, you can use it right here so you won't have to deal with the two red dinosaurs on the top and bottom platform.  Have everyone climb the right-most ladder and head over to the right until you face an obstacle.
That obstacle is a locked door, with a yellow keyhole on the opposite side.  Stand on a high spot with Olaf and raise the shield above his head.  Then, after switching to Erik, jump on it and then jump on the platform.  After that drop down from said platform on the right edge, and then turn back to the left.  Place the yellow key inside and the door will be unlocked.
You're almost there, just a little farther now!  A little apart from the door is snail slugging back and forth, so position Olaf and his shield in front of it.  Terminate the mollusk as Baleog and the path will clear out.  That is, until you come across a red dinosaur moving towards you, so station Olaf in front of it.  Then slay the foul beast as Baleog.  Up a little more close to the exit is a red dinosaur, and you know what that means: kill it!  Now everyone can head to the exit without fail!  You are done!  =)
Congratulations, you survived Stage 10!!!
Head to Stage 11G or 11S/12G!  =)

Wednesday, February 20, 2013

Dig Dug II: Trouble in Paradise (NES) Review

Written: February 19th-20th, 2013
Year: 1986, 1989 | Developed by: Namco | Published by: Bandai

Uh, oh, be careful not to fall off!
Show of hands: how many of you have played the second Dig Dug game out there before stumbling upon this review?  ...  Okay, better question: how many of you were aware that Dig Dug had a direct sequel before finding this review?  Well, the ever-classic 1982 arcade hit by Namco got a follow-up three years later in arcade format with the title of Dig Dug II, much to a less than favorable reaction from gamers and fans of the original.  Part of that is why it's not as popular and well-known as the original (and another reason comes from the fact that it was a victim of the infamous Event that Shall Not be Mentioned).  Unlike Pole Position II where it got a few updates from the original but otherwise played the same, Namco retained the elements of the first Dig Dug while also adding something new to the mix.

Dig Dug is back!
While I played the first Dig Dug since I was really young, I haven't played the 1985 sequel until sometime in the early 2000's when I played it on one of my cousins' MAME CD; I know the original arcade version is available in a few Namco Museum compilations, but I don't own the ones that have it.  Eventually I discovered an 8-bit conversion of the game on the NES, which was actually pretty nice since it meant I could play it on an actual TV screen.  Bad news is: it's the only port that was ever made for Dig Dug II.  Originally available on the Famicom in 1986, it found its way to American soil in 1989 with the full moniker Dig Dug II: Trouble in Paradise, a full three years later.  I'm not entirely certain why it took this long, or why it's only copyrighted "1982, 1989"; totally ignoring the fact that the sequel was also an arcade game at one point.  What, did they not have room for a third copyright?  Also, what a coincidence it is that the Western port was published by Bandai, who would eventually go on to merge with Namco to become Bandai Namco Games!  Cool!  =D  Given that I really, really, really, really, really love the original game to death, the question remains: how does this sequel stack up?

Ah, self-awareness!
You reprise the role of the eponymous main character Dig Dug where once again you must dispose yourself of Pookas and Fygars.  While in the original you dug underneath soil, the second game has you stay in the surface on a variety of different islands.  Dig Dug can still move in four different directions and he can still throw the hose toward the enemies and pump them up until they pop.  That's one of the ways you can take them down; another way is to use the jackhammer to drill out bits of the island.  Any time you stand above a round spot you can drill it in any of the four directions.  If it connects to a part of an island, or even a continuation of a drill mark, then depending on how many enemies were on the portions of the island that fell the more points you score.  After all the enemies are vanquished it's off to the next island!  Which begs the question of how he gets there when he clearly looks stranded?  Does he swim all the way to the next island, or does he carry a boat in his rear end that he just so happens to have?  I'm surprised not many people are questioning his mode of transportation!  =<  I mean, the first game I get, he traveled to different gardens; this game, on the other hand, has him travel to different islands!

After a lot of rounds it'll become dark
Dig Dug II controls decently, with the pump controlled by one button and the jackhammer used by another.  This time around the action is viewed from above, and before each round starts you get a glimpse of how many enemies are on said stage.  That's nice!  It is possible to press the pump button rapidly to take down an enemy quicker, and should you manage to create a square-shaped opening a fish will jump up, which you can grab with your pump for 500 points.  If an enemy comes into contact with you or if you fall down with a drilled out portion of the island, you lose a life.  You can move while you're drilling, but movement will be slower than if you were on foot.  Aesthetic-wise, it's a little faithful to the original arcade version, albeit with some differences.

The visuals in the coin-op version were medium- and vibrantly-colored, with Dig Dug's skin color pink and arms that were blue.  In the 8-bit conversion the colors were a tad brighter and less vibrant than in the arcade, and Dig Dug was blue-skinned and looks just like he did in the first game.  =/  Wait, so Dig Dug went from digger smurf to jackhammer human, only to become a jackhammer smurf in the end?
????????????????
How do you do that?  Aside from those details (and the fact that there are no shadows in the NES port), the animations are faithful as they are decent to watch.  The Pookas and Fygars look better than ever, and it's cool to see them facing the top and bottom directions for once.  They can still become invisible with their eyes in clear view, and if you eliminate enough of the enemies the remaining ones will try to evade your attack and even try to take their own lives by jumping towards the water.  Next up is the music: the arcade original had good music and some sound samples that helped add a little "oomph".  When it came to the 8-bit port, some of the "oomph" was lost in the transition.  That's not to say that the music is bad or anything, as it's nice to listen to, it just doesn't sound as ecstatic.  The regular sound effects are decent, and some sounds are lifted from the first game, like the pumping sound, the sound that plays when you lose a life, and the sound that plays when you get a game over.

Drill, Dig Dug, drill like you never drilled before!
Dig Dug II has good qualities going for it, and what's cool about the islands is how different they look any time you step on a new one.  While some islands will be shaped liked the individual letters of the company that developed the game, and one is shaped like the Roman numeral "II" (like in the title), most islands will have abstract designs.  What's also cool is how different the islands will look when you drill off bits and pieces of them in the process; making such a huge impact and difference on the solid ground you're walking on.  Gee, makes me wonder if I'm doing more bad here than I am good?  =\  Getting through each island may prove to be a lot of work sometimes, because sometimes the enemies might be faster or because they will outnumber you by a lot (the tenth round comes to mind), which makes for fun and exciting situations.  If you persevere long enough you'll see a mini cutscene (Dig Dug Theater) after every sixteenth stage, and they're fun to watch though brief they may be.  The only problem is that there are two cutscenes in the entire game!

I still think Fygar's stomach-popping death
looks graphic
Soooooo, verdict time!  =)  How do I feel about Dig Dug II, and is it worthy of the Dig Dug name?  Honestly, I think the second game is fun to play every once in a while, and I also find it to be a good game.  The gameplay is good, the challenge level is solid, and the variety of islands help it a lot.  A neat thing about the game is that you don't have to start all over if you lose all your lives.  After getting a game over, start the game, and when the font is white you can choose which of the rounds you've been to, including the latest one.  A nice option if I do say so myself.  I guess one of the reasons some found it inferior to the original was because it was less simple.  One of the appealing things about the first Dig Dug is how addicting it was despite its simple controls.  If you're going to deviate from simplicity, then you'd better have something that will make it enjoyable and engaging, and Dig Dug II sort of succeeds in that regard, even though it can get a little too hard at times.  And, for that matter, why is it called Dig Dug II if you never dig yourself down to the ground like you did in the first game?  In fact, you never even dig once in this sequel!  Isn't that false advertising?  Anyway, I found the second Dig Dug enjoyable, and it's a nice game to play in short bursts.  It's got things going for it and some things hindering it, but overall I think it's really good, just not as excellent as the original Dig Dug!  If you liked the first game, I think you'll enjoy this title enough; just don't expect it to be as a high-caliber as the original that started it all.

8.0/10
Thank you for reading, please leave a comment!  =)
P.S.: I'm surprised Namco never considered porting either Dig Dug game to Nintendo's 16-bit console, even in the same package.  How cool would that have been?  =D

Tuesday, February 19, 2013

StarBoy's Walkthrough: The Lost Vikings (SNES) Stage 9

StarBoy's Walkthrough:
(SNES edition)
February 19th, 2013
Stage 9 - CVRN
Item(s) - 1 healthy fruit, 1 extra health shield, 1 red key, 2 hams, 1 yellow key, 1 blue key, 1 wipeout bomb
As Patrick Warburton's character Wolf W. Wolf from the underrated (in my opinion) animated movie Hoodwinked! would say, "Oh, look: more cave!"  But don't worry, this is the last cave portion you have to go through in this area!
Choose Olaf to lead the way until you stumble upon an acid-spitting snail on a bridge.  Play now as Baleog and attack it two times to end that slug's misery.  Keep moving forward!
Walk a little until your road is blocked by a sturdy wall.  As Erik jump on that platform above the wall to claim a healthy fruit, and after that jump farther to the right platform where you'll discover an extra health shield for any of the vikings to use.  Jump back to your group...
and take down that wall!
Drop down as Olaf and situate your shield against that fireball-shooting cannon.  Now go down as the other two vikings and climb up a little to the left so the fireball won't reach you.  Once you do that have Olaf join them, and up ahead you'll find a red key!  Go forward as Olaf.
A caveman will be rolling your way, so have Baleog attack the nomad twice to eliminate him. Walk a little bit and insert the red key to the keyhole so the drawbridge will lower itself and you won't fall down on the spikes.
As Olaf move up a little where you'll discover a caveman rolling towards you.  Dispose of it as Baleog, and when Olaf walks a little more you'll find yet another damn caveman rolling against you!  Remember, they are vulnerable when they are not rolling!  Proceed!
Have the vikings march on ahead until you find yourselves blocked by a big wall.  With Erik in charge dispose of it immediately!
Make Olaf lead the way as you descend yourself down some platforms, walk in a downward hill, and position yourself ahead of the snail at the rising point of the lowest floor so it won't inflict damage on you.  Follow Olaf as Baleog and annihilate the mullosk so it won't bother you anymore!
If you move a little you'll discover the lone blue dinosaur enemy coming your way.  Slay the extinct reptile as Baleog with two hits.
This part is absolutely optional, but I'll go through it anyway.  Position Olaf next to the wall on the left in anticipation for the caveman attack.  After that break that wall and wait until it crumbles entirely.  Then kill the caveman when it's not rolling back and forth.  At the end toward the left is some ham.  Continue heading to the proper path to the right.
Walk until you come across a gap filled with lava below you, only this one has viking-sized bubbles protruding from it.  But before you do anything else, eradicate the snail on the platform ahead of you with two arrows, which should be easy since it's pretty much a sitting duck.  These bubbles are strong enough to carry any viking upward, but once it reaches its high point it will begin to pop.  Make Olaf go first and ride up until you reach an open space to the left, so drop yourself there and climb the hill until you stand next to a wall.  It takes several seconds for the bubbles to appear from the lava, so wait patiently until it comes; with that said, join Olaf as Erik and Baleog.
Behind the wall is a yellow key, but the fireball cannon is situated on the wall behind it as well.  With Olaf's shield at the door, ram the wall down as Erik.  As soon as it finishes crumbling, walk Olaf towards the wall with the shield down so no one will get hurt.  Give the yellow key to Erik and climb down the ladder.
Jump towards the platform slightly below to place the key inside the keyhole, unlocking the door to reveal a blue key!  Take it with you and climb back up the ladder.  Walk towards the edge the hill with Erik and Baleog, and once they're out of harm's way join them as Olaf.  When the bubble pops up from below, get on it and ride it until you reach the second highest floor.
On the platform above you to the right is a piece of ham, and on the opposite platform resides an acid-spewing snail.  Climb down the ladder as Erik and Olaf and insert the blue key in the keyhole to unlock the door.  Climb down some more stairs until you find yourself trapped by a wall.
This wall is positioned below a static door which is currently blocking your way to the exit up top.  Take the wall down once and for all, and once it's gone the door will slowly go down; if you wish you could grab that wipeout bomb near the right corner.  Another neat asset with Olaf's big shield is that it can hold certain items above you and remain in place until you move away; the first example comes into play here.  Make sure Erik stays on the left side of the door when it touches the ground, otherwise you're trapped with no way out and will have to start all over.
Now that the door is out of the way, you can keep progressing ahead.  Unfortunately there's a rolling caveman acting as a complete nuisance too, so defeat it once and for all as Baleog.  Then climb up the subsequent ladder with the trio of vikings and you're through here!  =)
Congratulations, you survived Stage 9!!!