Saturday, October 27, 2018

StarBoy's Walkthrough: The Lost Vikings (Genesis) Stage 18

StarBoy's Walkthrough:
(Genesis edition)
October 20th-21st/27th, 2018
Stage 18G - SNDS
Item(s) - 2 extra health shields, 1 ham, 1 yellow key, 1 healthy fruit, 1 set of flaming arrows, 1 steak, 1 red key, 1 blue key
The second of five stages exclusively available on the MegaDrive/Genesis version has our Vikings begin outside in the desert again.  As Baleog immediately dispose of the leaping spearman heading your way as you walk down the incline, which requires three hits.
Above the first palm tree you come across is an extra health shield which can only be accessed as Erik with his jumping ability after you climb up it.  Take it if you need it, then get back down.
Climb down the ladder that leads underneath the sands of the desert and walk all the way to the left and get the ham regardless of whether you need it.
Now climb down the ladder as Olaf and face the left with your shield by your side so that the fireballs emanating from the stationary cannon on the wall, but you'll have to be quick in switching controls as Baleog for Olaf is left in a vulnerable position on account of the leaping spearman that he's facing away from.  Eliminate the spearman quickly, and after you've done that there is another extra health shield and by the end on the right is a yellow key.  Take it, and then reconvene the two Vikings with Erik up above.
Walk down the incline until you're near the wide gap separated by quicksand.  Place the key inside the yellow keyhole to let the gap be filled by walking stones.
Across the gap is a scorpion which you can either attack up close with the sword or shoot from a distance an arrow thrice; whichever method you select, kill it.  Walk up the incline, and you'll contend with yet another scorpion up in the apex.  Slay it.
Walk down from the apex and you'll be confronted by the leaping spearman, so take him down swiftly.  Right after that is a scorpion that you'll have to deal with, and the thing to remember is that they'll shoot three differently angled projectiles from their tail (fortunately if you attack it while it's underneath the small gate then they'll only affect the ceiling to no avail, thereby making it a sitting duck).  Eradicate it, and then if you want then you can get the healthy fruit above the palm tree below the incline you just walked down from.
Climb down the ladder below the gate as Baleog and take care of the two leaping spearmen with swift force.
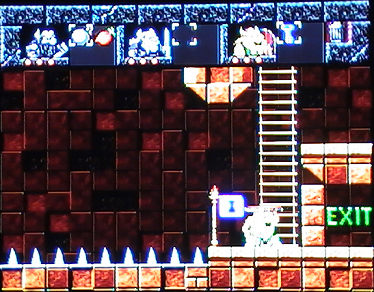
Climb down the ladder in the end, fall off the bottom edge, then climb down the ladder separated by a gap.  As Olaf face the stationary fireball-spewing cannon with his shield by his stead while Baleog takes a set of flaming arrows (which you can feel free to equip, even though there are no more enemies at this point).
Push the block to fill in the block-sized gap and get the steak.  Once Erik and Baleog are above the firing vicinity of the stationary fireball-spewing cannon, head up as Olaf and turn left in the event that it fires to block its fiery projectile.
Walk a little and in a gap above you there is a red key.  Place the shield above Olaf's head to give Erik a boost, then jump up and take it.  But because the fireball-spewing stationary cannon at the end on the right is on the same screen as you proceed to get it (it will not attack you from offscreen), you will have to time the key obtainment properly as it fires every few seconds.  Once that's done have Olaf's shield by his stead again and get the blue key next to the cannon as Erik when it's not firing.  Climb up the ladder and insert the key inside the red keyhole to open up a path.
Climb up the ladder that will take you back up to the desert again on the other side of the gap separated by quicksand that's rather steep to say the least but is no less lethal as it will suck in should you be unfortunate enough to fall in it.
Run down the incline and leap over the wide gap where the blue keyhole is situated.  Insert the blue key and the gap will be filled so that now all the Vikings can cross.  Walk to the exit at the end of the right, and you're done!  =)
Congratulations, you survived Stage 18G!!!
Stay tuned for the next Stage

StarBoy's Walkthrough: The Lost Vikings Stage 16S/17G

StarBoy's Walkthrough:
(SNES edition)
October 26th-27th, 2018
Stage 16S/17G - JMNN
Item(s) - 2 bombs, 2 healthy fruit A, 2 healthy fruit B, 1 red key, 1 flaming set of arrows, 1 blue key, 1 extra health shield
Getting deeper in the pyramid.  Move forward as Olaf and stop in front of a green snake that occasionally coils its body upward to spew a projectile towards you at a swift speed, so be sure to have your shield by your side.  Now switch as Baleog and go to where you left Olaf to take down the snake, which requires three hits.  In the corner above you is a bomb which only Erik can access by jumping up towards it if you need it.
Climb down the ladder as Baleog and be sure to have enough distance between you and the mummy when you get off so it doesn't touch you, because the curse of the mummy here entails becoming one when touched by them.  Swing your sword thrice against it to eliminate it.  At the end of the left is a healthy fruit A that is situated above walking distance, so if you want to obtain it then jump up to it as Erik.  Regardless, go back up the ladder and on the other side of the streaming water in the spot where you took care of the snake is a gray wall which you'll have to ram down as Erik after gaining some traction to open up a path.
Now this is the point Olaf and the other Vikings part ways, at least until the end of this stage.  Climb down the ladder and with your shield above your head walk off the edge to glide down, and for your convenience there are ladders sticking out from the ceiling which you can hang on to and climb up to gain altitude if you require it.  At one point is a ladder where on both sides there's acid occasionally dripping down, which you must avoid at all costs.
When there's no acid, get off the ladder and glide to the right until you grab and climb up the next ladder you'll come across.  At the top you'll find a blue key.  Take it.
Climb down the ladder and glide yourself towards the right some more, be mindful of the acid dripping from the ceiling and be sure not to get touched by them, get on the ladder, then finish your slow descent until you reach the end on the bottom right with the blue keyhole (with the majority of what is behind you comprising of spikes).  Insert the key and the path to the exit will open.
Switch back to Erik now and move until you come across a platform endlessly moving up and down, where above you in midair is a healthy fruit B which you can take if you need it.  At the bottom right corner where the platform is rising and descending continuously is a red key, but you'll have to time your retrieval of it properly.  When the platform is up drop down to get the key then get back up to where you dropped down from as soon as you can, otherwise you'll be squished by the force of the platform and be forced to start over.  With Erik you can jump towards the upper point, but with Baleog you'll have to wait until the platform reaches the bottom end to get on it prior to it rising up, but don't stay on it too long otherwise you'll get impaled by the spikes protruding from the ceiling, so get off soon as you reach the point above you.
Insert the red key you just got inside the red keyhole and a path will open up, and as soon as it does have Baleog kill the mummy in immediate vicinity with three sword strikes, then walk a little more until you come across another mummy, so do the same to that one.
As you move a little further you'll stumble upon a gray wall blocking your path, with a healthy fruit B that you can jump up to get if you want it.  Switch controls as Erik and have him demolish that obstacle by ramming it down, afterwards obliterate the mummy on the other side of that obstacle with Baleog's sword.
At the foot at the last incline you got down from hold down to climb down a hidden ladder.  It will lead you to a spot with a healthy fruit A and a flaming set of arrows on either side, but also two snake enemies on either side of the ladder.  Whatever position you find yourself in, the snakes will spit out their projectile quickly so you might sustain damage when that happens.  Since Olaf can't come and block out the projectile, you'll have to be quick in obtaining the two items (with the only way to take one snake down at this point being by placing a bomb beside it).  Go back up the ladder, and if you want to you can give these arrows to Baleog for him to equip.
Walk off the edge and you'll fall down to a small platform.  Do the same for that one to the left, then again to the right and you'll land on a platform where in front of it is a bomb which you can get by simply walking off that platform.
Below you is a slightly longer platform with a mummy slogging back and forth.  If you're uncertain of its placement, switch as Olaf to pan the screen towards him, then switch back as Baleog to pan back to him to get an idea of where the mummy is at.  When you're ready, land at the edge of the bottom platform, making sure to immediately face the right, and with the mummy cornered you can annihilate it.  Drop off towards the left and be sure that the mummy down there is not near you, so be sure to kill it.
After climbing down a ladder a little bit you'll find an extra health shield to your right, which seems like a bit of an afterthought considering you're almost through with the stage, but if you feel that you need it then you can go ahead and take it.  Join Olaf at the bottom of the ladder, head to the exit in the immediate right, and you're through!  =)
And that's a wrap!  ………...sorry.

Congratulations, you survived Stage 16S/17G!!!
Head to Stage 18G!  =)